Upgrading Cloudera Manager 4 to Cloudera Manager 5
Minimum Required Role: Full Administrator
This process applies to upgrading all versions of Cloudera Manager 4 to Cloudera Manager 5.
In most cases, you can upgrade without shutting down most CDH services, although you may need to stop some dependent services. CDH daemons can run unaffected while Cloudera Manager is upgraded, and the upgrade process does not affect your CDH installation. However, to use Cloudera Manager 5 features, all services must be restarted after the upgrade. After upgrading Cloudera Manager you may also want to upgrade CDH 4 clusters to CDH 5.
Follow these steps to upgrade Cloudera Manager 4 to the latest version of Cloudera Manager.
- Review Warnings and Notes
- Before You Begin
- Stop Selected Services and Roles
- Stop Cloudera Manager Server, Database, and Agent
- (Optional) Upgrade the JDK on Cloudera Manager Server and Agent Hosts
- Upgrade Cloudera Manager Software
- Start Cloudera Manager Server
- Upgrade and Start Cloudera Manager Agents
- Verify the Upgrade Succeeded
- Add Hive Gateway Roles
- Configure Cluster Version for Package Installs
- Upgrade Impala
- (Optional) Configure TLS/SSL for Cloudera Management Service
- (Optional) Deploy a Cloudera Manager Agent Upgrade
- Deploy a JDK Upgrade
- (Optional) Deploy Monitoring Upgrade
- Start Selected Services and Roles
- Deploy Updated Client Configurations
- Test the Installation
- (Optional) Upgrade CDH
Review Warnings and Notes
 Warning:
- Cloudera Management Service databases
Cloudera Manager 5 stores Host and Service Monitor data in a local datastore. The Cloudera Manager 4 to Cloudera Manager 5 upgrade wizard automatically migrates data from existing embedded PostgreSQL or external databases to the local datastore.For more information, see Data Storage for Monitoring Data.
The Host Monitor and Service Monitor databases are stored on the partition hosting /var. Ensure that you have at least 20 GB available on this partition.
If you have been storing the data in an external database, you can drop those databases after upgrade completes.
- Cloudera Management Service TLS/SSL configuration
If you have enabled TLS security for the Cloudera Manager Admin Console, as of Cloudera Manager 5.1, Cloudera Management Service roles try to communicate with Cloudera Manager using TLS, and fail to start until TLS/SSL properties have been configured.
- Impala
Cloudera Manager 5 supports Impala 1.2.1 and higher. If the version of your Impala service is 1.1 and lower, the following upgrade instructions will work, but once the upgrade has completed, you will see a validation warning for your Impala service, and you will not be able to restart your Impala (or Hue) services until you upgrade your Impala service to 1.2.1 and higher. If you want to continue to use Impala 1.1 and lower, do not upgrade to Cloudera Manager 5.
- Navigator
If you have enabled auditing with Cloudera Navigator, during the upgrade to Cloudera Manager 5, auditing is suspended and is only restarted when you restart the roles of audited services.
- JDK upgrade
If you upgrade the JDK during the installation of the Cloudera Manager Agent, you must restart all services. Additionally, if you have enabled TLS/SSL, you must reinstall CA certificates to your truststores. See Creating Truststores.
- Hard Restart of Cloudera Manager Agents
Certain circumstances require that you hard restart the Cloudera Manager Agent on each host:
- Deploying a fix to an issue where Cloudera Manager did not always correctly restart services
- Using the maximum file descriptor feature
- Enabling HDFS DataNodes to start if you perform the step (Optional) Upgrade CDH after upgrading Cloudera Manager
 Important:
- Hive
Cloudera Manager 4.5 added support for Hive, which includes the Hive Metastore Server role type. This role manages the metastore process when Hive is configured with a remote metastore.
When upgrading from Cloudera Manager versions before 4.5, Cloudera Manager automatically creates new Hive services to capture the previous implicit Hive dependency from Hue and Impala. Your previous services continue to function without impact. If Hue was using a Hive metastore backed by a Derby database, the newly created Hive Metastore Server also uses Derby. Because Derby does not allow concurrent connections, Hue continues to work, but the new Hive Metastore Server does not run. The failure is harmless (because nothing uses this new Hive Metastore Server at this point) and intentional, to preserve the set of cluster functionality as it was before upgrade. Cloudera discourages the use of a Derby-backed Hive metastore due to its limitations and recommends switching to a different supported database.
Cloudera Manager provides a Hive configuration option to bypass the Hive Metastore Server. When this configuration is enabled, Hive clients, Hue, and Impala connect directly to the Hive metastore database. Prior to Cloudera Manager 4.5, Hue and Impala connected directly to the Hive metastore database, so the bypass mode is enabled by default when upgrading to Cloudera Manager 4.5 and higher. This ensures that the upgrade does not disrupt your existing setup. You should plan to disable the bypass mode, especially when using CDH 4.2 and higher. Using the Hive Metastore Server is the recommended configuration, and the WebHCat Server role requires the Hive Metastore Server to not be bypassed. To disable bypass mode, see Disabling Bypass Mode .
Cloudera Manager 4.5 and higher also supports HiveServer2 with CDH 4.2. In CDH 4, HiveServer2 is not added by default, but can be added as a new role under the Hive service (see Role Instances). In CDH 5, HiveServer2 is a mandatory role.
 Note: If you are upgrading from Cloudera Manager Free Edition 4.5 and lower, you are upgraded to
Cloudera Express, which includes a number of features that were previously available only with Cloudera Enterprise. Of those features, activity monitoring requires a database. Thus, upon upgrading to Cloudera Manager 5, you must specify
Activity Monitor database information. You have the option to use the embedded PostgreSQL database, which Cloudera Manager can set up automatically.
Note: If you are upgrading from Cloudera Manager Free Edition 4.5 and lower, you are upgraded to
Cloudera Express, which includes a number of features that were previously available only with Cloudera Enterprise. Of those features, activity monitoring requires a database. Thus, upon upgrading to Cloudera Manager 5, you must specify
Activity Monitor database information. You have the option to use the embedded PostgreSQL database, which Cloudera Manager can set up automatically.Before You Begin
Warning: Cloudera Manager 5 does not support CDH 3 and you cannot upgrade Cloudera Manager 4 to Cloudera Manager 5 if you have a cluster running CDH
3. Therefore, to upgrade CDH 3 clusters to CDH 4 using Cloudera Manager, you must use Cloudera Manager 4.- Upgrade Cloudera Manager 3.7.x to Cloudera Manager 4 - See Upgrading Cloudera Manager 3.7.x.
- Upgrade all CDH 3 clusters to CDH 4 - See Upgrading CDH 3. If you attempt to upgrade to Cloudera Manager 5 and Cloudera Manager 4 is managing a CDH 3 cluster, the Cloudera Manager 5 server will not start, and you will be notified that you must downgrade to Cloudera Manager 4. For instructions for downgrading, see Reverting a Failed Cloudera Manager Upgrade. After downgrading, you must upgrade your CDH 3 cluster to CDH 4 before you can upgrade Cloudera Manager. See Upgrading CDH 3.
- Obtain host credentials - For Cloudera Manager to upgrade the Agent packages, you must have SSH access and be able to log in using a root account or an account that has password-less sudo permission. See Cloudera Manager 5 Requirements and Supported Versions for more information.
- Prepare databases - See Database Considerations for Cloudera Manager Upgrades.
- Cloudera Manager 5 supports HDFS high availability only with automatic failover. If your cluster has enabled high availability without automatic failover, you must enable automatic failover before upgrading to Cloudera Manager 5. See Configuring HDFS High Availability.
Stop Selected Services and Roles
| Condition | Procedure |
|---|---|
| Running a version of Cloudera Manager that has the Cloudera Management Service | Stop the Cloudera Management Service. |
| Upgrading from Cloudera Manager 4.5 and higher, and using the embedded PostgreSQL database for the Hive metastore | Stop the services that have a dependency on the Hive metastore (Hue, Impala, and Hive). You cannot stop the Cloudera Manager Server
database while these services are running. If you attempt to upgrade while the embedded database is running, the upgrade fails. Stop services that depend on the Hive metastore in the following order:
|
| Running Cloudera Navigator | Stop any of the following roles whose service's Queue Policy configuration (navigator.batch.queue_policy) is set to SHUTDOWN:
|
Stop Cloudera Manager Server, Database, and Agent
- Use the Admin Console to stop any running commands. These include commands a user runs and commands Cloudera Manager automatically triggers in response to a state change or a schedule. You can either wait for commands to complete or abort any running commands. For more information on viewing and aborting running commands, see Viewing Running and Recent Commands. If you do not stop all commands, the Cloudera Manager Server will fail to start after upgrade.
- On the host running the Cloudera Manager Server, stop the Cloudera Manager Server:
$ sudo service cloudera-scm-server stop
- If you are using the embedded PostgreSQL database for Cloudera Manager, stop the database:
$ sudo service cloudera-scm-server-db stop
Important: If you are not running the embedded database service
and you attempt to stop it, you receive a message indicating that the service cannot be found. If instead you get a message that the shutdown failed, the embedded database is still running, probably
because services are connected to the Hive metastore. If the database shutdown fails due to connected services, issue the following command:
- RHEL-compatible 7 and higher:
$ sudo service cloudera-scm-server-db next_stop_fast
$ sudo service cloudera-scm-server-db stop
- All other Linux distributions:
sudo service cloudera-scm-server-db fast_stop
- RHEL-compatible 7 and higher:
- If the Cloudera Manager host is also running the Cloudera Manager Agent, stop the Cloudera Manager Agent:
$ sudo service cloudera-scm-agent stop
(Optional) Upgrade the JDK on Cloudera Manager Server and Agent Hosts
If you are manually upgrading the Cloudera Manager Agent software in Upgrade and Start Cloudera Manager Agents (Packages) or Install Cloudera Manager Server and Agent Software (Tarballs), and you are upgrading to CDH 5, install the Oracle JDK on the Agent hosts as described in Java Development Kit Installation.
If you are not running Cloudera Manager Server on the same host as a Cloudera Manager Agent, and you want all hosts to run the same JDK version, optionally install the Oracle JDK on that host.
Upgrade Cloudera Manager Software
Choose a procedure based on how you installed Cloudera Manager:
Upgrade Cloudera Manager Server (Packages)
- To upgrade the Cloudera Manager Server packages, you can upgrade from the Cloudera repository at https://archive.cloudera.com/cm5/, or you can create your own repository, as described in Understanding Custom
Installation Solutions. You must create your own repository if you are upgrading a cluster that does not have Internet access.
- Find the Cloudera repo file for your distribution by starting at https://archive.cloudera.com/cm5/
and navigating to the directory that matches your operating system.
For example, for Red Hat or CentOS 6, you would go to https://archive.cloudera.com/cm5/redhat/6/x86_64/cm/. In that directory, find the repo file that contains information including the repository base URL and GPG key. The contents of the cloudera-manager.repo are similar to the following:
[cloudera-manager]
# Packages for Cloudera Manager, Version 5, on RHEL or CentOS 6 x86_64
name=Cloudera Manager
baseurl=https://archive.cloudera.com/cm5/redhat/6/x86_64/cm/5/
gpgkey = https://archive.cloudera.com/cm5/redhat/6/x86_64/cm/RPM-GPG-KEY-cloudera
gpgcheck = 1
For Ubuntu or Debian systems, go to the appropriate release directory, for example, https://archive.cloudera.com/cm4/debian/wheezy/amd64/cm. The repo file, in this case, cloudera.list, is similar to the following:# Packages for Cloudera Manager, Version 5, on Debian 7.0 x86_64 deb https://archive.cloudera.com/cm5/debian/wheezy/amd64/cm wheezy-cm5 contrib deb-src https://archive.cloudera.com/cm5/debian/wheezy/amd64/cm wheezy-cm5 contrib
- Replace the repo file in the configuration location for the package management software for your system.
Operating System Commands RHEL Copy cloudera-manager.repo to /etc/yum.repos.d/. SLES Copy cloudera-manager.repo to /etc/zypp/repos.d/. Ubuntu or Debian Copy cloudera.list to /etc/apt/sources.list.d/. - Run the following commands:
Operating System Commands RHEL $ sudo yum clean all $ sudo yum upgrade cloudera-manager-server cloudera-manager-daemons cloudera-manager-agent
Note:
- yum clean all cleans yum cache directories, ensuring that you download and install the latest versions of the packages.
- If your system is not up to date, any underlying system components must be upgraded before yum update can succeed. yum indicates which components must be upgraded.
- If the Cloudera Manager instance you are upgrading uses the embedded PostgreSQL database, add cloudera-manager-server-db-2 to the list of packages in the yum upgrade command. The embedded PostgreSQL database should not be used in production environments.
SLES $ sudo zypper clean --all $ sudo zypper up -r https://archive.cloudera.com/cm5/sles/11/x86_64/cm/5/
To download from your own repository:$ sudo zypper clean --all $ sudo zypper rr cm $ sudo zypper ar -t rpm-md http://myhost.example.com/path_to_cm_repo/cm $ sudo zypper up -r http://myhost.example.com/path_to_cm_repo
Ubuntu or Debian The following commands clean cached repository information and update Cloudera Manager components: $ sudo apt-get clean $ sudo apt-get update $ sudo apt-get dist-upgrade $ sudo apt-get install cloudera-manager-server cloudera-manager-daemons cloudera-manager-agent
If the Cloudera Manager instance you are upgrading uses the embedded PostgreSQL database, add cloudera-manager-server-db-2 to the list of packages in the apt-get install command. The embedded PostgreSQL database should not be used in production environments.
During this process, you may be prompted about your configuration file version:Configuration file `/etc/cloudera-scm-agent/config.ini' ==> Modified (by you or by a script) since installation. ==> Package distributor has shipped an updated version. What would you like to do about it ? Your options are: Y or I : install the package maintainer's version N or O : keep your currently-installed version D : show the differences between the versions Z : start a shell to examine the situation The default action is to keep your current version.
You will receive a similar prompt for /etc/cloudera-scm-server/db.properties. Answer N to both prompts.
- Find the Cloudera repo file for your distribution by starting at https://archive.cloudera.com/cm5/
and navigating to the directory that matches your operating system.
- If you customized /etc/cloudera-scm-agent/config.ini, your customized file is moved to a file with the extension .rpmsave or .dpkg-old. Merge any customizations into /etc/cloudera-scm-agent/config.ini installed by the package manager.
| OS | Packages |
|---|---|
| RPM-based distributions |
$ rpm -qa 'cloudera-manager-*' cloudera-manager-repository-5.0-1.noarch cloudera-manager-server-5.8.0-0.cm580.p0.41.el6.x86_64 cloudera-manager-agent-5.8.0-0.cm580.p0.41.el6.x86_64 cloudera-manager-daemons-5.8.0-0.cm580.p0.41.el6.x86_64 |
| Ubuntu or Debian |
~# dpkg-query -l 'cloudera-manager-*' Desired=Unknown/Install/Remove/Purge/Hold | Status=Not/Inst/Conf-files/Unpacked/halF-conf/Half-inst/trig-aWait/Trig-pend |/ Err?=(none)/Reinst-required (Status,Err: uppercase=bad) ||/ Name Version Description +++-======================-======================-============================================================ ii cloudera-manager-agent 5.8.0-0.cm580.p0.41~sq The Cloudera Manager Agent ii cloudera-manager-daemo 5.8.0-0.cm580.p0.41~sq Provides daemons for monitoring Hadoop and related tools. ii cloudera-manager-serve 5.8.0-0.cm580.p0.41~sq The Cloudera Manager Server |
Install Cloudera Manager Server and Agent Software (Tarballs)
$ sudo mkdir /opt/cloudera-manager
$ sudo tar xzf cloudera-manager*.tar.gz -C /opt/cloudera-manager
The files are extracted to a subdirectory named according to the Cloudera Manager version being extracted. For example, files could be extracted to /opt/cloudera-manager/cm-5.0/. This full path is needed later and is referred to as tarball_root directory.
Perform Configuration Required by Single User Mode
If you are creating a Cloudera Manager deployment that employs single user mode, perform the configuration steps described in Single User Mode Requirements.Create Users
The Cloudera Manager Server and managed services require a user account to complete tasks. When installing Cloudera Manager from tarballs, you must create this user account on all hosts manually. Because Cloudera Manager Server and managed services are configured to use the user account cloudera-scm by default, creating a user with this name is the simplest approach. This created user, is used automatically after installation is complete.
$ sudo useradd --system --home=/opt/cloudera-manager/cm-5.6.0/run/cloudera-scm-server --no-create-home --shell=/bin/false --comment "Cloudera SCM User" cloudera-scmEnsure the --home argument path matches your environment. This argument varies according to where you place the tarball, and the version number varies among releases. For example, the --home location could be /opt/cm-5.6.0/run/cloudera-scm-server.
Create the Cloudera Manager Server Local Data Storage Directory
- Create the following directory: /var/lib/cloudera-scm-server.
- Change the owner of the directory so that the cloudera-scm user and group have ownership of the directory. For example:
$ sudo mkdir /var/log/cloudera-scm-server
$ sudo chown cloudera-scm:cloudera-scm /var/log/cloudera-scm-server
Configure Cloudera Manager Agents
- On every Cloudera Manager Agent host, configure the Cloudera Manager Agent to point to the Cloudera Manager Server by setting the following properties in the tarball_root/etc/cloudera-scm-agent/config.ini configuration file:
Property Description server_host Name of the host where Cloudera Manager Server is running. server_port Port on the host where Cloudera Manager Server is running. - By default, a tarball installation has a var subdirectory where state is stored. In a non-tarball installation, state is stored in /var. Cloudera recommends that you reconfigure the tarball installation to use an external directory as the /var equivalent (/var or any other directory outside the tarball) so that when you upgrade Cloudera Manager, the new tarball installation can access this state. Configure the installation to use an external directory for storing state by editing tarball_root/etc/default/cloudera-scm-agent and setting the CMF_VAR variable to the location of the /var equivalent. If you do not reuse the state directory between different tarball installations, duplicate Cloudera Manager Agent entries can occur in the Cloudera Manager database.
Configuring for a Custom Cloudera Manager User and Custom Directories
- /var/log/cloudera-scm-headlamp
- /var/log/cloudera-scm-firehose
- /var/log/cloudera-scm-alertpublisher
- /var/log/cloudera-scm-eventserver
- /var/lib/cloudera-scm-headlamp
- /var/lib/cloudera-scm-firehose
- /var/lib/cloudera-scm-alertpublisher
- /var/lib/cloudera-scm-eventserver
- /var/lib/cloudera-scm-server
- Change ownership of existing directories:
- Use the chown command to change ownership of all existing directories to the Cloudera Manager user. If the Cloudera Manager username and group are
cloudera-scm, to change the ownership of the headlamp log directory, you issue a command similar to the following:
$ sudo chown -R cloudera-scm:cloudera-scm /var/log/cloudera-scm-headlamp
- Use the chown command to change ownership of all existing directories to the Cloudera Manager user. If the Cloudera Manager username and group are
cloudera-scm, to change the ownership of the headlamp log directory, you issue a command similar to the following:
- Use alternate directories:
- If the directories you plan to use do not exist, create them. For example, to create /var/cm_logs/cloudera-scm-headlamp for use by the cloudera-scm user, you can use the following commands:
mkdir /var/cm_logs/cloudera-scm-headlamp
chown cloudera-scm /var/cm_logs/cloudera-scm-headlamp
- Connect to the Cloudera Manager Admin Console.
- Select
- Select .
- Click the Configuration tab.
- Enter a term in the Search field to find the settings to be changed. For example, you might enter /var or directory.
- Update each value with the new locations for Cloudera Manager to use.
Note: The configuration property for the Cloudera Manager Server Local
Data Storage Directory (default value is: /var/lib/cloudera-scm-server) is located on a different page:
- Select .
- Type directory in the Search box.
- Enter the directory path in the Cloudera Manager Server Local Data Storage Directory property.
- Click Save Changes to commit the changes.
- If the directories you plan to use do not exist, create them. For example, to create /var/cm_logs/cloudera-scm-headlamp for use by the cloudera-scm user, you can use the following commands:
Start Cloudera Manager Server
Choose a procedure based on how you installed Cloudera Manager:
Start the Cloudera Manager Server (Packages)
- If you are using the embedded PostgreSQL database for Cloudera Manager, start the database:
$ sudo service cloudera-scm-server-db start
- Start the Cloudera Manager Server:
$ sudo service cloudera-scm-server start
You should see the following:Starting cloudera-scm-server: [ OK ]
If the Cloudera Manager Server does not start, see Troubleshooting Installation and Upgrade Problems.
Start the Cloudera Manager Server (Tarballs)
- As root:
$ sudo tarball_root/etc/init.d/cloudera-scm-server start
- As another user. If you run as another user, ensure the user you created for Cloudera Manager owns the location to which you extracted the tarball including the newly created database
files. If you followed the earlier examples and created the directory /opt/cloudera-manager and the user cloudera-scm, you could use the
following command to change ownership of the directory:
$ sudo chown -R cloudera-scm:cloudera-scm /opt/cloudera-manager
Once you have established ownership of directory locations, you can start Cloudera Manager Server using the user account you chose. For example, you might run the Cloudera Manager Server as cloudera-service. In this case, you have the following options:
- Run the following command:
$ sudo -u cloudera-service tarball_root/etc/init.d/cloudera-scm-server start
- Edit the configuration files so the script internally changes the user. Then run the script as root:
- Remove the following line from tarball_root/etc/default/cloudera-scm-server:
export CMF_SUDO_CMD=" "
- Change the user and group in tarball_root/etc/init.d/cloudera-scm-server to the user you want the server to run as. For example, to run as cloudera-service, change
the user and group as follows:
USER=cloudera-service
GROUP=cloudera-service
- Run the server script as root:
$ sudo tarball_root/etc/init.d/cloudera-scm-server start
- Remove the following line from tarball_root/etc/default/cloudera-scm-server:
- Run the following command:
- To start the Cloudera Manager Server automatically after a reboot:
- Run the following commands on the Cloudera Manager Server host:
- RHEL-compatible and SLES (only RHEL is supported for DSSD D5 DataNodes)
$ cp tarball_root/etc/init.d/cloudera-scm-server /etc/init.d/cloudera-scm-server
$ chkconfig cloudera-scm-server on
- Debian/Ubuntu (not supported for DSSD D5 DataNodes)
$ cp tarball_root/etc/init.d/cloudera-scm-server /etc/init.d/cloudera-scm-server
$ update-rc.d cloudera-scm-server defaults
- RHEL-compatible and SLES (only RHEL is supported for DSSD D5 DataNodes)
- On the Cloudera Manager Server host, open the /etc/init.d/cloudera-scm-server file and change the value of CMF_DEFAULTS from ${CMF_DEFAULTS:-/etc/default} to tarball_root/etc/default.
- Run the following commands on the Cloudera Manager Server host:
Upgrade and Start Cloudera Manager Agents
Choose a procedure based on how you installed Cloudera Manager:
Upgrade and Start Cloudera Manager Agents (Packages)
Important: All hosts in the cluster must have access to the Internet if you use
archive.cloudera.com as the source for installation files. If you do not have Internet access, create a custom repository.- Log in to the Cloudera Manager Admin Console.
- Upgrade hosts using one of the following methods:
- Cloudera Manager installs Agent software
- Select Yes, I would like to upgrade the Cloudera Manager Agent packages now and click Continue.
- Select the release of the Cloudera Manager Agent to install. Normally, this is the Matched Release for this Cloudera Manager Server. However, if you used a custom repository (instead of archive.cloudera.com) for the Cloudera Manager server, select Custom Repository and provide the required information. The custom repository allows you to use an alternative location, but that location must contain the matched Agent version.
- Click Continue. The JDK Installation Options page displays.
- Leave Install Oracle Java SE Development Kit (JDK) checked to allow Cloudera Manager to install the JDK on each cluster host, or uncheck if you plan to install it yourself.
- If local laws permit you to deploy unlimited strength encryption, and you are running a secure cluster, check the Install Java Unlimited Strength Encryption Policy Files checkbox.
- Specify credentials and initiate Agent installation:
- Select root or enter the username for an account that has password-less sudo permission.
- Select an authentication method:
- If you choose password authentication, enter and confirm the password.
- If you choose public-key authentication, provide a passphrase and path to the required key files.
- You can specify an alternate SSH port. The default value is 22.
- You can specify the maximum number of host installations to run at once. The default value is 10.
- Click Continue. The Cloudera Manager Agent packages are installed.
- Click Continue. The Host Inspector runs to inspect your managed hosts for correct versions and configurations. If there are problems, you can make changes and then rerun the inspector. When you are satisfied with the inspection results, click Finish.
- Manually install Agent software
- On all cluster hosts except the Cloudera Manager Server host, stop the Agent:
$ sudo service cloudera-scm-agent stop
- In the Cloudera Admin Console, select No, I would like to skip the agent upgrade now and click Continue.
- Copy the appropriate repo file as described in Upgrade Cloudera Manager Server (Packages).
- Run the following commands:
Operating System Commands RHEL $ sudo yum clean all $ sudo yum upgrade cloudera-manager-server cloudera-manager-daemons cloudera-manager-agent
Note:
- yum clean all cleans yum cache directories, ensuring that you download and install the latest versions of the packages.
- If your system is not up to date, any underlying system components must be upgraded before yum update can succeed. yum indicates which components must be upgraded.
- If the Cloudera Manager instance you are upgrading uses the embedded PostgreSQL database, add cloudera-manager-server-db-2 to the list of packages in the yum upgrade command. The embedded PostgreSQL database should not be used in production environments.
SLES $ sudo zypper clean --all $ sudo zypper up -r https://archive.cloudera.com/cm5/sles/11/x86_64/cm/5/
To download from your own repository:$ sudo zypper clean --all $ sudo zypper rr cm $ sudo zypper ar -t rpm-md http://myhost.example.com/path_to_cm_repo/cm $ sudo zypper up -r http://myhost.example.com/path_to_cm_repo
Ubuntu or Debian Use the following commands to clean cached repository information and update Cloudera Manager components: $ sudo apt-get clean $ sudo apt-get update $ sudo apt-get dist-upgrade $ sudo apt-get install cloudera-manager-agent cloudera-manager-daemons
During this process, you may be prompted about your configuration file version:Configuration file `/etc/cloudera-scm-agent/config.ini' ==> Modified (by you or by a script) since installation. ==> Package distributor has shipped an updated version. What would you like to do about it ? Your options are: Y or I : install the package maintainer's version N or O : keep your currently-installed version D : show the differences between the versions Z : start a shell to examine the situation The default action is to keep your current version.
You will receive a similar prompt for /etc/cloudera-scm-server/db.properties. Answer N to both prompts.
- If you customized /etc/cloudera-scm-agent/config.ini, your customized file is moved to a file with the extension .rpmsave or .dpkg-old. Merge any customizations into /etc/cloudera-scm-agent/config.ini installed by the package manager.
- On all cluster hosts, start the Agent:
$ sudo service cloudera-scm-agent start
- On all cluster hosts except the Cloudera Manager Server host, stop the Agent:
- Cloudera Manager installs Agent software
- If you are upgrading from a free version of Cloudera Manager prior to 4.6:
- Click Continue to assign the Cloudera Management Services roles to hosts.
- If you are upgrading to Cloudera Enterprise, specify required databases:
- Choose the database type:
- Keep the default setting of Use Embedded Database to have Cloudera Manager create and configure required databases. Record the auto-generated
passwords.
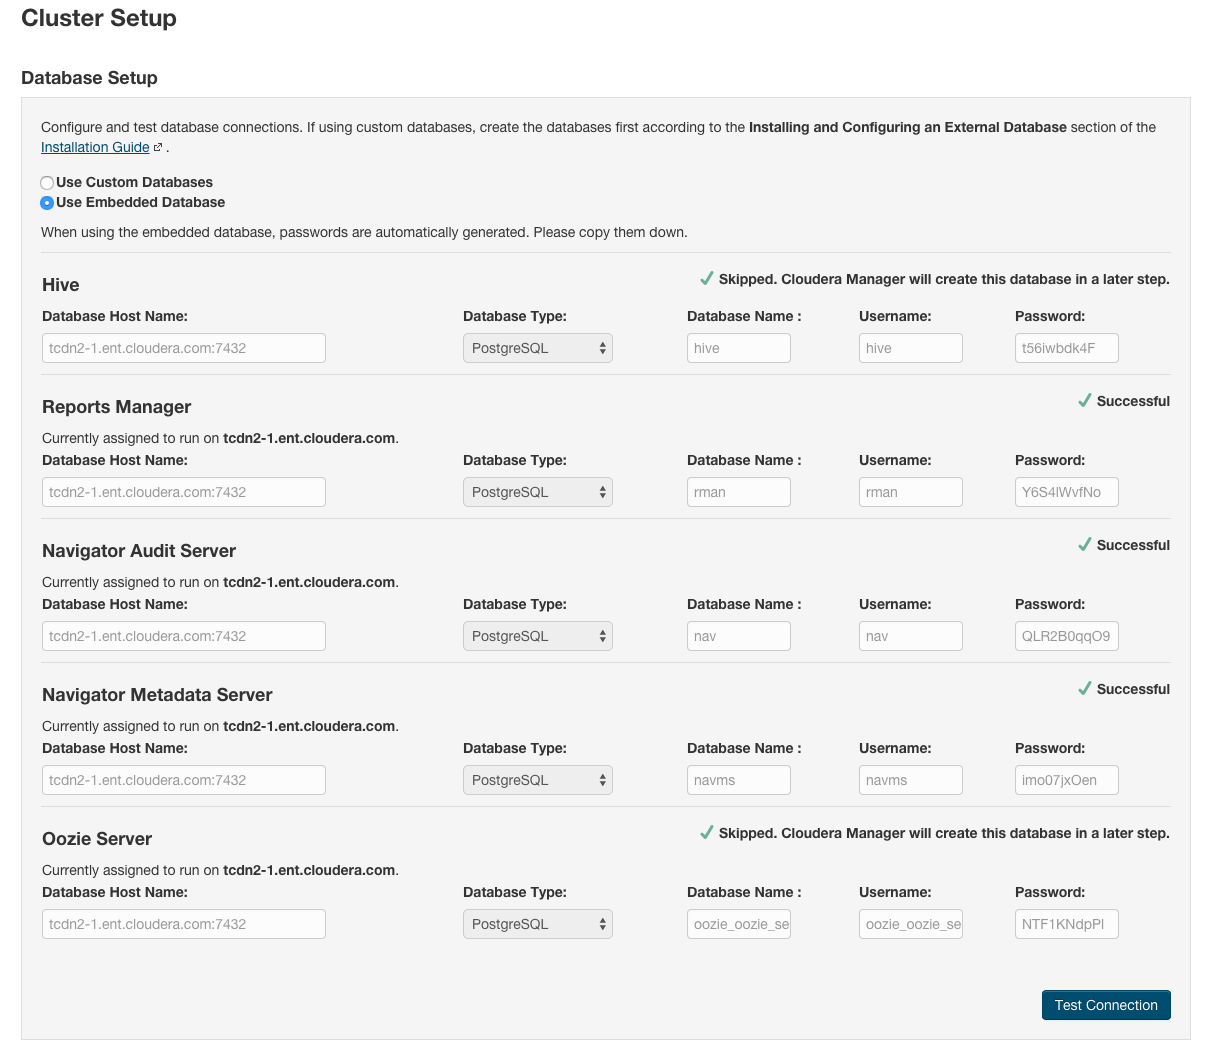
- Select Use Custom Databases to specify external database host, enter the database type, database name, username, and password for the database that you created when you set up the database.
- If you are adding the Oozie service, you can change your Oozie configuration to control when data is purged to improve performance, cut down on database disk usage, improve upgrade performance, or to keep the history for a longer period of time. See Configuring Oozie Data Purge Settings Using Cloudera Manager.
- Keep the default setting of Use Embedded Database to have Cloudera Manager create and configure required databases. Record the auto-generated
passwords.
- Click Test Connection to confirm that Cloudera Manager can communicate with the database using
the information you have supplied. If the test succeeds in all cases, click Continue; otherwise, check and correct the information you have provided for the database
and then try the test again. (For some servers, if you are using the embedded database, you will see a message saying the database will be created at a later step in the installation process.)
The Cluster Setup Review Changes screen displays.
- Choose the database type:
- Click Finish.
- If you are upgrading from Cloudera Manager prior to 4.5:
- Select the host for the Hive Metastore Server role.
- Review the configuration values and click Accept to continue.
Note:
- If Hue was using a Hive metastore backed by a Derby database, the newly created Hive Metastore Server also uses Derby. Because Derby does not allow concurrent connections, Hue continues to work, but the new Hive Metastore Server does not run. The failure is harmless (because nothing uses this new Hive Metastore Server at this point) and intentional, to preserve the set of cluster functionality as it was before upgrade. Cloudera discourages the use of a Derby-backed Hive metastore due to its limitations and recommends switching to a different supported database.
- Prior to Cloudera Manager 4.5, Hue and Impala connected directly to the Hive metastore database, so the bypass mode is enabled by default when upgrading to Cloudera Manager 4.5 and higher. This ensures that the upgrade does not disrupt your existing setup. You should plan to disable the bypass mode, especially when using CDH 4.2 and higher. Using the Hive Metastore Server is the recommended configuration, and the WebHCat Server role requires the Hive Metastore Server to not be bypassed. To disable bypass mode, see Disabling Bypass Mode . After changing this configuration, you must redeploy your client configurations, restart Hive, and restart any Hue or Impala services configured to use that Hive.
- If you are using CDH 4.0 or CDH 4.1, see known issues related to Hive in Known Issues and Workarounds in Cloudera Manager 5.
- If you are upgrading from Cloudera Manager 4.5 and lower, correct the Hive home directory permissions (/user/hive) as follows:
sudo -u hdfs hdfs dfs -chown hive:hive /user/hive/
sudo -u hdfs hdfs dfs -chmod 1775 /user/hive/
- If you are upgrading from Cloudera Manager prior to 4.8 and have an Impala service, assign the Impala Catalog Server role to a host.
- Review the configuration changes to be applied.
- Click Finish.
All services (except for the services you stopped in Stop Selected Services and Roles) should be running.
Restart Cloudera Manager Agents (Tarballs)
Stop Cloudera Manager Agents (Tarballs)
- To stop the Cloudera Manager Agent, run this command on each Agent host:
$ sudo tarball_root/etc/init.d/cloudera-scm-agent stop
- If you are running single
user mode, stop Cloudera Manager Agent using the user account you chose. For example, if you are running the Cloudera Manager Agent as cloudera-scm, you have the
following options:
- Run the following command:
$ sudo -u cloudera-scm tarball_root/etc/init.d/cloudera-scm-agent stop
- Edit the configuration files so the script internally changes the user, and then run the script as root:
- Remove the following line from tarball_root/etc/default/cloudera-scm-agent:
export CMF_SUDO_CMD=" "
- Change the user and group in tarball_root/etc/init.d/cloudera-scm-agent to the user you want the Agent to run as. For example, to run as cloudera-scm, change the user
and group as follows:
USER=cloudera-scm
GROUP=cloudera-scm
- Run the Agent script as root:
$ sudo tarball_root/etc/init.d/cloudera-scm-agent stop
- Remove the following line from tarball_root/etc/default/cloudera-scm-agent:
- Run the following command:
Start Cloudera Manager Agents (Tarballs)
- To start the Cloudera Manager Agent, run this command on each Agent host:
$ sudo tarball_root/etc/init.d/cloudera-scm-agent start
When the Agent starts, it contacts the Cloudera Manager Server. - If you are running single
user mode, start Cloudera Manager Agent using the user account you chose. For example, to run the Cloudera Manager Agent as cloudera-scm, you have the following
options:
- Run the following command:
$ sudo -u cloudera-scm tarball_root/etc/init.d/cloudera-scm-agent start
- Edit the configuration files so the script internally changes the user, and then run the script as root:
- Remove the following line from tarball_root/etc/default/cloudera-scm-agent:
export CMF_SUDO_CMD=" "
- Change the user and group in tarball_root/etc/init.d/cloudera-scm-agent to the user you want the Agent to run as. For example, to run as cloudera-scm, change the user
and group as follows:
USER=cloudera-scm
GROUP=cloudera-scm
- Run the Agent script as root:
$ sudo tarball_root/etc/init.d/cloudera-scm-agent start
- Remove the following line from tarball_root/etc/default/cloudera-scm-agent:
- Run the following command:
- To start the Cloudera Manager Agents automatically after a reboot:
- Run the following commands on each Agent host:
- RHEL-compatible and SLES (only RHEL is supported for DSSD D5 DataNodes)
$ cp tarball_root/etc/init.d/cloudera-scm-agent /etc/init.d/cloudera-scm-agent
$ chkconfig cloudera-scm-agent on
- Debian/Ubuntu (not supported for DSSD D5 DataNodes)
$ cp tarball_root/etc/init.d/cloudera-scm-agent /etc/init.d/cloudera-scm-agent
$ update-rc.d cloudera-scm-agent defaults
- RHEL-compatible and SLES (only RHEL is supported for DSSD D5 DataNodes)
- On each Agent, open the tarball_root/etc/init.d/cloudera-scm-agent file and change the value of CMF_DEFAULTS from ${CMF_DEFAULTS:-/etc/default} to tarball_root/etc/default.
- Run the following commands on each Agent host:
Verify the Upgrade Succeeded
- In the Cloudera Manager Admin Console, click the Hosts tab.
- Click Host Inspector. On large clusters, the host inspector may take some time to finish running. You must wait for the process to complete before proceeding to the next step.
- Click Show Inspector Results. All results from the host inspector process are displayed, including the currently installed versions. If this includes listings of current component versions, the installation completed as expected.
Add Hive Gateway Roles
- Go to the Hive service.
- Click the Instances tab.
- Click the Add Role Instances button.
- Select the hosts on which you want a Hive gateway role to run. This ensures that the Hive client configurations are deployed on these hosts.
Configure Cluster Version for Package Installs
If you have installed CDH as a package, after an installation or upgrade, make sure that the cluster CDH version matches the package CDH version, using the procedure in Configuring the CDH Version of a Cluster. If the cluster CDH version does not match the package CDH version, Cloudera Manager incorrectly enables and disables service features based on the cluster's configured CDH version.
Upgrade Impala
If your version of Impala is 1.1 and lower, upgrade to Impala 1.2.1 and higher.
(Optional) Configure TLS/SSL for Cloudera Management Service
- Do one of the following:
- Select .
- On the tab, in Cloudera Management Service table, click the Cloudera Management Service link.
- Click the Configuration tab.
- Select .
- Select .
- Edit the following TLS/SSL properties according to your cluster configuration.
Property Description TLS/SSL Client Truststore File Location Path to the client truststore file used in HTTPS communication. The contents of this truststore can be modified without restarting the Cloudera Management Service roles. By default, changes to its contents are picked up within ten seconds. TLS/SSL Client Truststore File Password Password for the client truststore file. - Click Save Changes to commit the changes.
- Restart the Cloudera Management Service.
(Optional) Deploy a Cloudera Manager Agent Upgrade
- Deploying a fix to an issue where Cloudera Manager did not always correctly restart services
- Using the maximum file descriptor feature
- Enabling HDFS DataNodes to start if you perform the step (Optional) Upgrade CDH after upgrading Cloudera Manager
- Stop all CDH and managed services.
- On all hosts with Cloudera Manager Agents, hard restart the Agents. Before performing this step, ensure you understand the semantics of the hard_restart
command by reading Hard Stopping and Restarting Agents.
- Packages
- RHEL-compatible 7 and higher:
$ sudo service cloudera-scm-agent next_stop_hard
$ sudo service cloudera-scm-agent restart
- All other Linux distributions:
$ sudo service cloudera-scm-agent hard_restart
- RHEL-compatible 7 and higher:
- Tarballs
- To stop the Cloudera Manager Agent, run this command on each Agent host:
- RHEL-compatible 7 and higher:
$ sudo tarball_root/etc/init.d/cloudera-scm-agent next_stop_hard
$ sudo tarball_root/etc/init.d/cloudera-scm-agent restart
- All other Linux distributions:
$ sudo tarball_root/etc/init.d/cloudera-scm-agent hard_restart
- RHEL-compatible 7 and higher:
- If you are running single user mode, start Cloudera Manager Agent using the
user account you chose. For example to run the Cloudera Manager Agent as cloudera-scm, you have the following options:
- Run the following command:
- RHEL-compatible 7 and higher:
$ sudo -u cloudera-scm tarball_root/etc/init.d/cloudera-scm-agent next_stop_hard
$ sudo -u cloudera-scm tarball_root/etc/init.d/cloudera-scm-agent restart
- All other Linux distributions:
$ sudo -u cloudera-scm tarball_root/etc/init.d/cloudera-scm-agent hard_restart
- RHEL-compatible 7 and higher:
- Edit the configuration files so the script internally changes the user, and then run the script as root:
- Remove the following line from tarball_root/etc/default/cloudera-scm-agent:
export CMF_SUDO_CMD=" "
- Change the user and group in tarball_root/etc/init.d/cloudera-scm-agent to the user you want the Agent to run as. For
example, to run as cloudera-scm, change the user and group as follows:
USER=cloudera-scm
GROUP=cloudera-scm
- Run the Agent script as root:
- RHEL-compatible 7 and higher:
$ sudo -u cloudera-scm tarball_root/etc/init.d/cloudera-scm-agent next_stop_hard
$ sudo -u cloudera-scm tarball_root/etc/init.d/cloudera-scm-agent restart
- All other Linux distributions:
$ sudo -u cloudera-scm tarball_root/etc/init.d/cloudera-scm-agent hard_restart
- RHEL-compatible 7 and higher:
- Remove the following line from tarball_root/etc/default/cloudera-scm-agent:
- Run the following command:
- To stop the Cloudera Manager Agent, run this command on each Agent host:
- Packages
- Start all services.
Deploy a JDK Upgrade
If you upgraded the JDK when installing the Cloudera Manager Agents, do the following:
- If the Cloudera Manager Server host is also running a Cloudera Manager Agent, restart the Cloudera Manager Server:
- Packages
$ sudo service cloudera-scm-server restart
- Tarballs
$ sudo tarball_root/etc/init.d/cloudera-scm-agent restart
If the Cloudera Manager Server does not start, see Troubleshooting Installation and Upgrade Problems.
- Packages
- If you have not restarted services in previous steps, restart all services:
- On the tab, click
 next to the cluster name and select Restart.
 - In the confirmation dialog box, click Restart.
- On the tab, click
(Optional) Deploy Monitoring Upgrade
- The Cloudera Manager Agent has been upgraded and restarted.
- The monitored roles have been restarted.
- On the tab, click next to the cluster name and select Restart.
- In the confirmation dialog box that displays, click Restart.
Start Selected Services and Roles
- If you are not upgrading CDH, do the following:
- If you are running Cloudera Navigator, start the following roles of audited services:
- HDFS - NameNode
- HBase - Master and RegionServers
- Hive - HiveServer2
- Hue - Beeswax Server
- On the
tab, click next to the name of each service you shut down and select Start.
- In the confirmation dialog box, click Start.
- If you are running Cloudera Navigator, start the following roles of audited services:
- On the tab, click next to the Cloudera Management Service and select Start.
- In the confirmation dialog box, click Start.
Deploy Updated Client Configurations
 icon on the tab. To ensure clients have current
information about resources, update the client configuration:
icon on the tab. To ensure clients have current
information about resources, update the client configuration:
- On the tab, click next to the cluster name and select Deploy Client Configuration.
- In the confirmation dialog box, click Deploy Client Configuration.
Test the Installation
When you have finished the upgrade to Cloudera Manager, you can test the installation to verify that the monitoring features are working as expected; follow the instructions in Testing the Installation.
(Optional) Upgrade CDH
Cloudera Manager 5 can manage both CDH 4 and CDH 5, so upgrading existing CDH 4 installations is not required, but you may want to upgrade to the latest version. For more information on upgrading CDH, see Upgrading CDH and Managed Services Using Cloudera Manager.
| << Upgrading Cloudera Manager 5 to the Latest Cloudera Manager | ©2016 Cloudera, Inc. All rights reserved | Upgrading Cloudera Manager 3.7.x >> |
| Terms and Conditions Privacy Policy |