Running Spark Applications Using IPython and Jupyter Notebooks
IPython Notebook is a system similar to Mathematica that allows you to create "executable documents." IPython Notebooks integrate formatted text (Markdown), executable code (Python), mathematical formulas (LaTeX), and graphics and visualizations (matplotlib) into a single document that captures the flow of an exploration and can be exported as a formatted report or an executable script.
The version of IPython you can use depends on which version of Python is installed on your OS. On RHEL 6-compatible systems, where the default Python version is 2.6, you can use IPython 1.2.1. If you have or can install Python 2.7 or higher, Cloudera recommends that you use IPython 4.0 (renamed Jupyter).
This section describes how to install and configure IPython and Jupyter to work with PySpark.
- Installing and Configuring IPython 1.2.1
- Installing and Configuring Jupyter
- Starting a Notebook with PySpark
- Creating a Client Session and Notebook
- References
Installing and Configuring IPython 1.2.1
On the driver host:- Install IPython 1.2.1 dependencies Jinja2, pyzmq, and Tornado:
$ pip install Jinja2
$ pip install pyzmq
$ pip install tornado
- Install IPython 1.2.1:
$ pip install 'ipython<2'
- Set the following environment variables:
$ export PYSPARK_DRIVER_PYTHON=ipython
$ export PYSPARK_DRIVER_PYTHON_OPTS="notebook --NotebookApp.open_browser=False --NotebookApp.ip='*' --NotebookApp.port=8880"
Installing and Configuring Jupyter
Depending on how you want to install and use Python 2.7, do one of the following:- Parcel installation
- Install the Anaconda parcel.
- On the driver host, set the following environment variables:
$ export PYSPARK_DRIVER_PYTHON=/opt/cloudera/parcels/Anaconda/bin/jupyter
$ export PYSPARK_DRIVER_PYTHON_OPTS="notebook --NotebookApp.open_browser=False --NotebookApp.ip='*' --NotebookApp.port=8880"
- On the driver and executor hosts, set the following variable:
$ export PYSPARK_PYTHON=/opt/cloudera/parcels/Anaconda/bin/python
- Manual installation with virtual environment
- If you do not have Python 2.7, install the Anaconda 2.7 distribution on the Spark driver and executor hosts. If you already have Python 2.7, install Jupyter on the driver host.
- On all hosts, create a virtual environment containing Python 2.7.
- On the driver host, set the following environment variables:
$ export PYSPARK_DRIVER_PYTHON=/path/to/python27/bin/jupyter
$ export PYSPARK_DRIVER_PYTHON_OPTS="notebook --NotebookApp.open_browser=False --NotebookApp.ip='*' --NotebookApp.port=8880"
- On the driver and executor hosts, set the following variable:
$ export PYSPARK_PYTHON=/path/to/python27/bin/python
Starting a Notebook with PySpark
- On the driver host, choose a directory notebook_directory to run the Notebook. notebook_directory contains the .ipynb files that represent the different notebooks that can be served.
- In notebook_directory, run pyspark with your desired runtime options. You should see output like the following:
$ pyspark options
2015-12-01 13:13:18.223 [NotebookApp] Using MathJax from CDN: http://cdn.mathjax.org/mathjax/latest/MathJax.js
2015-12-01 13:13:18.231 [NotebookApp] CRITICAL | WARNING: The notebook server is listening on all IP addresses and not using encryption. This is not recommended.
2015-12-01 13:13:18.231 [NotebookApp] CRITICAL | WARNING: The notebook server is listening on all IP addresses and not using authentication. This is highly insecure and not recommended.
2015-12-01 13:13:18.232 [NotebookApp] Serving notebooks from local directory: notebook_directory
2015-12-01 13:13:18.232 [NotebookApp] The [IPython|Jupyter] Notebook is running at: http://[all ip addresses on your system]:8880/
2015-12-01 13:13:18.233 [NotebookApp] Use Control-C to stop this server and shut down all kernels (twice to skip confirmation).
Creating a Client Session and Notebook
- Open http://notebook_host:8880/ in a browser.
The IPython screen should look like:

The Notebooks tab lists the available notebooks.
The Jupyter screen looks like:

The Files tab lists the available notebooks. - Click New Notebook (IPython) or select (Jupyter), which creates a new .ipynb file and opens the new notebook. If you have installed CDH as a parcel, in the notebook
console you should see the following:
2015-12-01 13:30:41.513 [NotebookApp] Connecting to: tcp://127.0.0.1:51095
2015-12-01 13:30:41.529 [NotebookApp] Connecting to: tcp://127.0.0.1:36922
2015-12-01 13:30:41.549 [NotebookApp] Connecting to: tcp://127.0.0.1:53548
WARNING: User-defined SPARK_HOME (/opt/cloudera/parcels/CDH-...) overrides detected (/opt/cloudera/parcels/CDH/lib/spark).
WARNING: Running spark-class from user-defined location.
SLF4J: ...
15/12/01 13:30:43 INFO SparkContext: Running Spark version ...
- In the notebook heading, click Untitled0. The Rename Notebook dialog box displays.
- Erase the default name, type a notebook name, and click OK.
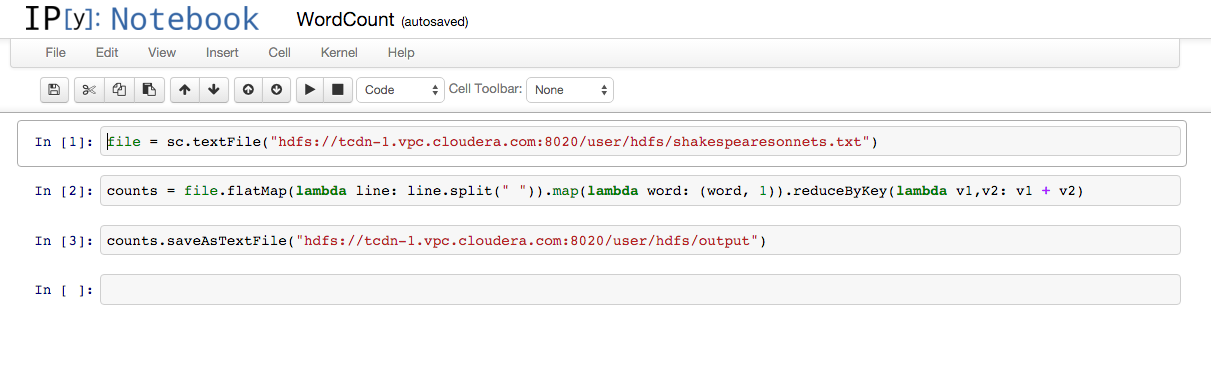
- Enter statements in the notebook cells and press Shift+Enter or Shift+Return to run. This screenshot shows a session
to compute a word count:
References
These references describe benefits of using IPython Notebooks and list some useful notebooks:
| << Running Spark Python Applications | ©2016 Cloudera, Inc. All rights reserved | Tuning Spark Applications >> |
| Terms and Conditions Privacy Policy |